
Microneedling Treatment Process | Step-by-Step Photos
Tired skin is frustrating, to say the least. No matter the moisturiser, contrary to the cleanser, sometimes tired skin needs a little more help from within rather than topical products. Even deep penetrating skincare products need a helping hand in remodeling the actual cells of our skin rather than oil secretion, so where do we turn when tired skin has got us down? Well, microneedling is a very good place to start.
What is microneedling?
Microneedling is a skin needling treatment that causes minute damage to the surface of the skin. It uses a pen-like handheld device with vibrating needles to create tiny punctures in the epidermis. These punctures are little wounds that break the surface and force the skin into a controlled internal healing process. The skin works to heal from the inside-out, beginning the production of new collagen and fresh skin cells to replace those lost and damaged. The result is safely rejuvenated skin suitable for treating mild acne scarring, pigmentation, fine lines, minor volume loss, and generally helping to restore a fresh skin glow. Goodbye tired skin!
What is the microneedling treatment process?
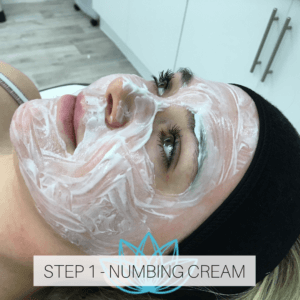
Step 1: Numbing cream
Some clients may opt for numbing cream, and some may not. It helps to lessen the stinging sensation to nothing more than just a vibration on the skin. If you’d like numbing cream, we help you into a headband to restrain any wayward hair and then apply it your face. We then leave it to work its magic for around 15-20 minutes, after which you’ll be ready for treatment.
Step 2: Beginning
We wipe away one area of numbing first (in this case, the forehead) and leave the rest intact before we begin needling the newly naked area. We begin with downwards motions, guiding the device in straight lines down your treatment area until the whole area has been needled.

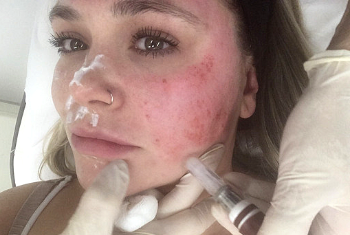
Step 3: Tiny blood droplets
There will be some tidy blood droplets on the skin after treatment, which we wipe away with an antiseptic wipe between treating areas. If we begin with your forehead, as we did with our model pictured, we finish treating this area before we dab away any droplets and move onto the next area.

Step 4: Repeat!
We repeat the sequence of wiping away numbing cream, needling, and wiping away blood droplets until we have treated the whole face or the designated areas. We move at your pace, though if you opt for the numbing cream there shouldn’t be any discomfort.

Step 5: Post-treatment soothing masque
After you’ve received your microneedling treatment across all of the treatment areas, we cleanse your face with a light aftercare antiseptic solution to remove any remaining cream and blood droplets. After this, we apply a soothing face masque that has added hyaluronic acid, moisturising minerals, and other beneficial ingredients to improve your skin’s appearance.

Step 6: Sun protection
Before we conclude your treatment with us at Pro Aesthetics Nottingham, we’ll apply an oil-free broad-spectrum SPF 50 sun cream. The sun protection we recommend in particular is Heliocare, which is tinted to provide the same kind of coverage as your foundation. It’s a great way of receiving treatment, controlling the skin’s redness post-treatment, and also protecting the vulnerable surface layer from further harm from the sun. We also sell tinted Heliocare sun protection online and in the clinic!

Microneedling in Nottingham is an incredibly popular treatment, and this client model has very kindly offered to document her healing process after the treatment and her subsequent results once they have developed. We can’t wait to bring you more treatment guides, so if you’re considering fresher, younger-looking and healthier skin simply get in touch! Enquire online or speak to a member of our team on 0115 9831097 to book your free consultation.